


Regrinding endmills on GriStar Series No.1 (2F Endmill)
Oct. 06.2021

In the first article of “Resharpening Endmills with the GriStar Series,” we will discuss resharpening the bottom edge of a two-flute end mill.
About the bottom blade shape
The bottom edge of a two-flute end mill varies in type depending on the tool material and application, but it is basically a combination of the relief surface and gash depth.
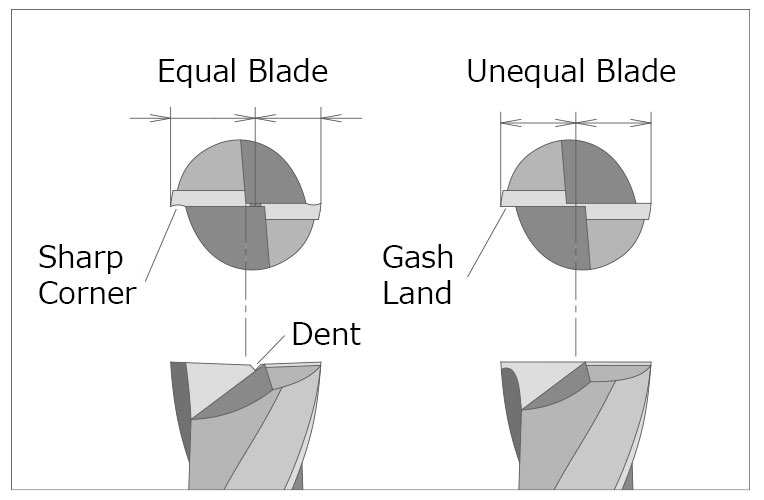
Unequal blades … 5:3 (Longer blade: shorter blade) The length of the two blades is unequal. Since the cutting edge is also formed in the center and a pocket for chip evacuation is created, machining in the axial direction (Z direction) becomes easier. However, since the load applied to the cutting edge is unbalanced between the right and left sides, chattering is likely to occur, so care must be taken during precision machining.
Equal blade: The left and right blades are of equal length. There is no cutting edge in the center, and chip evacuation near the center is poor, so it is not suitable for axial machining with poor elimination. However, since the load on the left and right flutes is equal, it has the advantage of being less prone to chattering. It is often used in small-diameter end mills.
Sharp Corner … The rake groove is utilized near the periphery to form a sharp cutting edge. It is often used in HSS end mills with high toughness.
Gash Land The gash is applied to the cutting edge by the rake groove on the outer edge to make the cutting edge obtuse. This is often used for carbide end mills that do not have toughness.
Dent …Make a notch at the intersection of the two blades. In the case of carbide cutting tools, the width of the gash may be minus to form a “dent”. This is used to improve chip evacuation and to eliminate the difference in height between the two flutes.

Chamfer・Corner R … Attach a Chamfer-face or Relief-face blade to the outside of the cutting-edge. This is used to prevent chipping and for Chamfer machining.
Let’s try setting
click on the “Bottom Edge” tab at the top of the editing window to select the bottom edge shape. When you have finished selecting, set the relief angle and gash parameters.
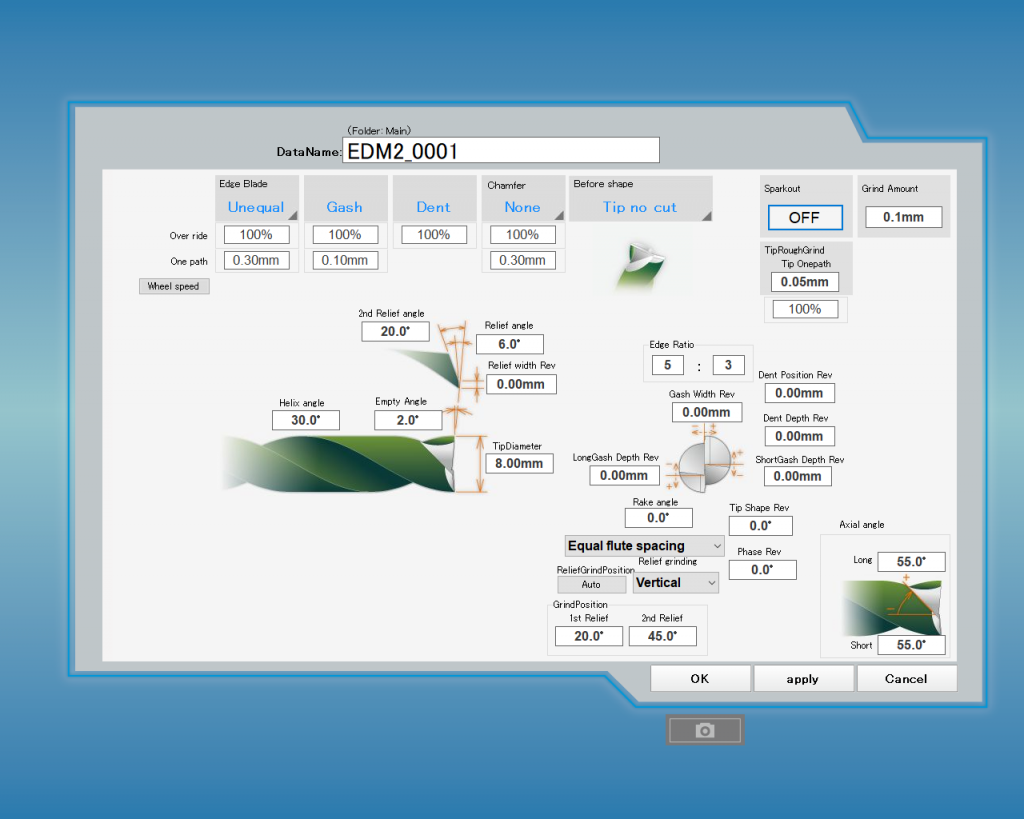
The following are diagrams of typical shapes and their parameters (reference values).
Unequal blade, Sharp Corner, Dent (HSS)
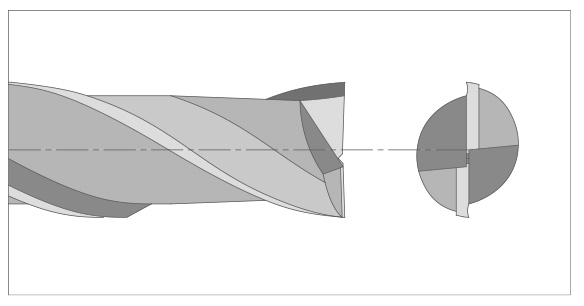
Leave a little gash width. Turn on the dent processing. (Grinding implementation).
| Parameter | parameter Value |
|---|---|
| Bottom Blade (Tag) | Equal Blade |
| Dent | Grinding |
| Concave Angle | 2° |
| Rake Angle | 2° |
| Gash Width Revision | Set in minus direction and leave some width |
Unequal Blade, Gash land, Dent (Carbide)
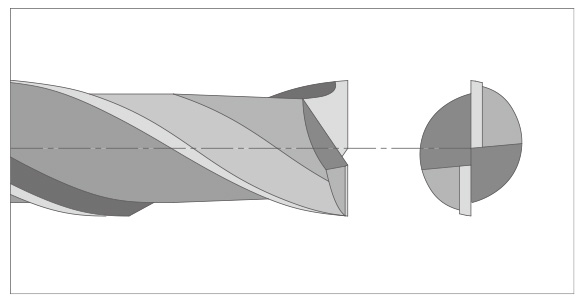
Set the gash width to zero and make a dent. The dent process is OFF (no grinding). When adjusting the gash land of the cutting edge, first adjust the gash width and then adjust the gash land angle.
| Parameter | Parameter Value |
|---|---|
| Bottom Blade(Tag) | Unequal Blade |
| Dent | No regrinding |
| Concave Angle | 0° |
| Rake Angle | 2° |
| Gash Width Revision | Adjust Gash width to zero Set in + direction |
Equal Blade, Sharp Corner (HSS)

Leave a little gash width.
| Parameter | Parameter Value |
|---|---|
| Bottom Blade (Tag) | Equal Blade |
| Dent | No regrinding |
| Concave Angle | 2° |
| Rake Angle | 0~2° |
| Gash Width Revision | Adjust to leave a little gash. |
Equal blade・Gash land(Carbide)

Leave a little gash width. Adjust the gash land of the cutting edge by “Tip shape Revision” and “Phase Revision”.
| Parameter | Parameter Value |
|---|---|
| Bottom Blade (Tag) | Equal Blade |
| Dent | No regrinding |
| Concave Angle | 0° |
| Rake Angle | 2° |
| Gash width revision | Adjust to leave a little gash. |
| Gash depth revision | Adjust to not go too deep. (The deeper it is, the more likely the center will break off.) |
That’s all about this article. In the next article, we will discuss the resharpening of end mills with 3 to 6 flutes.
<Previous> Regrinding drills on GriStar Series No.4 (Step)
<Next> Regrinding endmills on GriStar Series No.2 (3~6F Endmill)